TargetSpawner is a set-up for spawning scripted patterns of actors, for use in challenges or other gameplay. TargetSpawner is an abstraction – it doesn’t specify the type of actor that is spawned and could be used make various types of gameplay with a common scripting format.
BP_TargetSpawner is the blueprint class used for this, but you’ll also need the struct STargetTrackRow, as the basis for a data table. In the project depot you’ll also find an example Excel file that can be used as a template.
Below are two sections – “How does it work” and a tutorial for setting up an activity.
How does it work
Inside the struct and data table
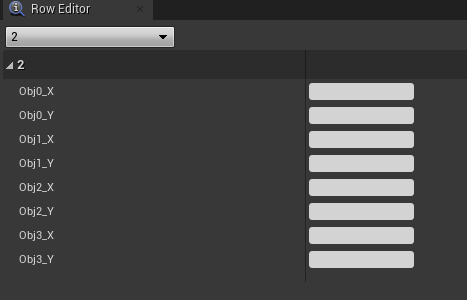
The struct STargetTrackRow simply contains 8 strings representing 4 sets of 2D axes.

A data table based on STargetTrackRow is one or more sets of these eight strings. Each row represents a time step. Each pair of columns (e.g. Obj0_X and Obj0_Y) represent the co-ordinates of an object to be spawned at that time.

The row name is not important. In the example above, the rows are named as 0.5s intervals, but they could have any unique name and don’t impact on the tempo at all. Also in the example above, there are empty rows from 8.5s (row 18) onwards – that makes no difference and they could be deleted.
Inside BP_TargetSpawner
Variables

BP_TargetSpawner has seven variables.
- SpawnAreaSize is an editable Vector2D that defines the height and width of the spawn area.
- SpawnAreaHeight is an editable float that defines how heigh spawn area sits above the origin of the BP_TargetSpaner actor. This means that BP_TargetSpawner can easily be placed at ground level with the spawn area sitting above it, e.g. from knee-height to head-height.
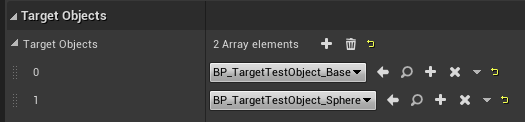
- TargetObjects is an editable array of Actor classes. It is used to define the one to four types of actor objects that this TargetSpawner can spawn. The four types correspond to the four pairs of columns in the data table, in order. Anything other than the first four will be ignored.
- TargetTracks is an editable array of data tables. This defines which data table to use for this TargetSpawner. If there is more than one listed, they can be selected by index or picked at random when the scripting starts.
- TrackTimeStep is an editable float that is used to specify the tempo of the script. It is a duration in seconds, so 0.5 will give you two beats per second, or two data table rows per second.
- CurrentTable and CurrentRow are non-editable ints that are used for iteration.
Functions
On construct, BP_TargetSpawner uses the parameters to size and position the spawn area. Scripting begins when StartTrack is executed.
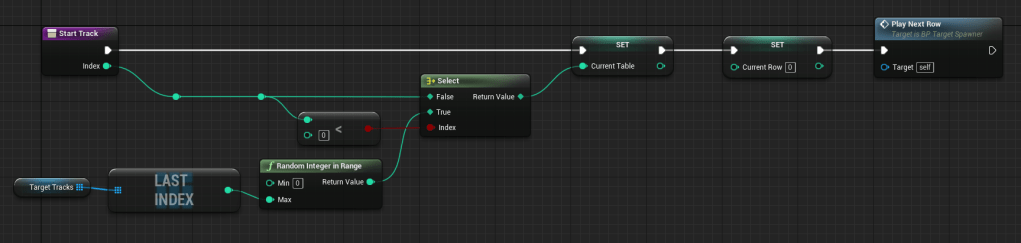
StartTrack takes an int as a parameter, which specifies which index of TargetTracks will be played. If it is less than zero (default = -1) then it will pick one at random.
SpawnObject spawns an actor class indexed in TargetObjects at a relative position within the spawn area. It is called by PlayNextRow. PlayNextRow also makes use of GetCurrentTrack, GetCurrentRow and GetCurrentTrackLength which are used to read the specified data table and provide the co-ordinates. When finished PlayNextRow calls the event WaitForNextRow, which re-calls PlayNextRow after a delay, unless the end of the table has been reached.

Tutorial
Here we will walk through the steps of adding a TargetSpawner for an activity you are creating.
Target objects
First, you will need some actor classes to use as your target actors. All the movement, collision and behaviour of the targets is handled by the target actors, in order for TargetSpawner to be more abstract/versatile. These could be any object at all as long as it is derived from Actor.
A typical use case would be to create an actor class that has a visible mesh or sprite and moves, either towards the player, or to be dodged. Another use case might be an actor that is a target to be punched or hit in some other way, that appears at a location and then disappears. You can specify up to four of these classes for use with a single BP_TargetSpawner.
BP_TargetSpawner
Add a BP_TargetSpawner to your level.
(If you are making an actor that contains a whole challenge or other activity, you could add the BP_TargetSpawner as a child actor instead.)

Place the actor (origin) at ground height. The magenta arrow represents the forward vector of the spawn area. The target actors will be spawned with the same rotation as this arrow (in world-space). In the details panel, adjust the SpawnAreaSize and SpawnAreaHeight to suit your gameplay.

SpawnAreaSize is a radius. The default values shown above would create a spawn area that is 2m wide and 1.5m tall. It would sit 0.5m off the ground, extending from 0.5m to 2m.
Next add your target object classes to TargetObjects. You’ll need at least one and you have up to four. The order is significant, as it will match the columns in your table.
Unless you already have a data table to use, you can leave TargetTracks empty for now, but TrackTimeStep can be set to be the tempo of your scripted spawning. This is a duration in seconds, so 0.5 will give you two beats per second, or two data table rows per second in other words. Smaller numbers will give you more fine control over the timing, but a longer table. Bigger numbers will give you a smaller table with less fine timing control, but will also help you to make more rhythmic patterns.
Making a data table
You can use either the Unreal data table editor or a spreadsheet application (or even a text editor) to add the actual scripted timing, but first you’ll want to create the data table itself.
In Content Browser, right click and make a new Data Table asset (in the Miscellaneous sub-menu). You’ll be prompted to select a struct to use as for your table rows. You must select STargetTrackRow.
Editing in Unreal
Hit the Add button on the toolbar to add new rows. You can name your rows by double-clicking the RowName column. You might like to name your rows to follow your chosen timing, or you can skip naming them entirely.
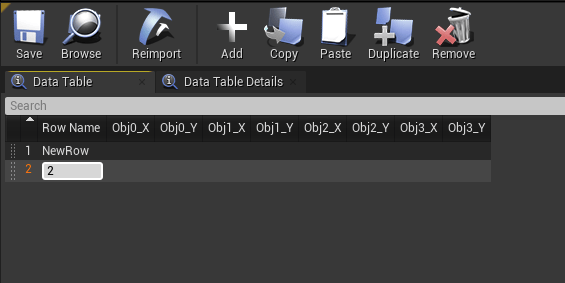
Once you’ve created rows, you can edit them in the row editor panel.
Editing in Excel
Open TargetTrackTest.xlsx or TargetTrackTest.csv, as a template, and save as a new file.

Leave row 1 as it is. You can change the row “names” in colum A however – they can be anything as long as they are unique. In the template they are half-second timings, but you might use a different tempo.
In either method, edit your rows so that each row is a time-step, and each pair of columns is a location within the spawn area. Type co-ordinates to create your spawn pattern.
The co-ordinates are relative to the spawn area. 0,0 is the centre. 1,1 is the bottom-right and -1,-1 is the top-left. You can add as many rows as you like, but you cannot add more columns.
In Unreal…
Once your pattern is complete, you can just hit save and it’s done. If you need to make changes, you can just edit and re-save.
In Excel…
Once your pattern is complete, save your spreadsheet as a CSV file.
Return to the Unreal editor and open your new Data Table asset. Hit the Re-Import button on the toolbar and browse to your CSV file. Your spreadsheet will now be imported to the data table.
If you make any changes to your spreadsheet, be sure to save your CSV and hit the Re-Import button again.
Now that you have a data table in Unreal containing your scripted spawning, the last step is to select your BP_TargetSpawner in the world and add your table to it’s TargetTracks parameter.
To start the BP_TargetSpawner, just call the StartTrack function, either in the level BP or by some other scripted way.

Leave a comment