This document explains our procedural level system called RouteMgr. It is divided into three sections: an overview, how to use it, and troubleshooting.
Overview
Assets
The RouteMgr “system” consists of a few different actors and a specific way of setting up levels and sublevels.

- BP_RouteMgr is an actor that must be placed in a persistent level to control the streaming of level chunks.
- BP_RouteNode, BP_RouteNode_StitchPoint and BP_RouteNode_RouteNode are actors placed inside chunk levels to help with positioning and stitching them.
- S_ChunkInfo and E_ChunkCategories are used to store information about the chunks. S_ChunkInfo is the basis for the data tables which constitute a level. This is so that certain data about the level is stored outside of the level asset – we can read it before loading the level itself.
- BP_RouteTrigger is an overlap volume that tells calls an event in a BP_RouteMgr when touched by a player pawn. It’s used to tell RouteMgr to load in a new chunk and possibly unload an old one.
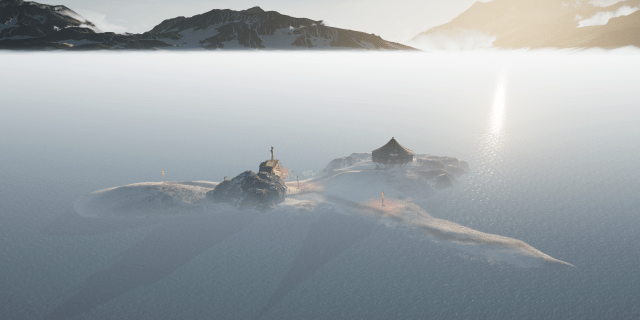
- BP_FollowingOcean creates an ocean and/or horizon that maintains a position relative to the player, so that however far you travel you are always at the centre of the environment.
- WBP_ChunkTool is a utility widget you can use in editor to automate some data-input. WBP_ChunkTool is still a work-in-progress and currently the data must be input manually.
Terminology
This section clarifies some of the jargon used in this document. These are terms made up for this solution and not official terminology.
- Chunk. A chunk is a sub-level that can be streaming procedurally via RouteMgr.
- Parent/child chunk. Some chunks are sub-levels intended to be attached to another sub-level, for example to create variations with different obstacles or decoration, these are child chunks and the main chunk they are attached to is the parent chunk.
- Stitching. When a sub-level is streamed via RouteMgr, it’s transform is adjusted so as to create a continuous path. This is what we’re calling stitching. The level’s transform is adjusted so that a stitch node in one chunk matches a stitch node in another chunk.
- Categories. Chunks fit into one of four categories: RunFlat, RunSteep, Climb, Station and HeroSection. These are used for selecting/ordering chunks.
- Head/body/tail. The head chunks are the chunks that have been loaded ahead of the player. The tail chunks are the chunks that exist behind the player before being unloaded. The current chunk that the player is traversing is the body chunk.
Naming Conventions
- Levels
LVL_RouteMgr_[LEVELNAME]
[LEVELNAME] is the name of the level/environment
- Chunks
SLVL_RouteMgr_[LEVELNAME]_[CATEGORY][INDEX]
[LEVELNAME] is the name of the level/environment
[CATEGORY] is the type of chunk, e.g. RunFlat, Station
[INDEX] is an identifier, could just as easily be a name as a number
- Child chunks
SLVL_RouteMgr_[LEVELNAME]_[CATEGORY][INDEX]_[CHILDTYPE][INDEX]
[LEVELNAME] is the name of the level/environment
[CATEGORY] is the type of chunk, e.g. RunFlat, Station
[CHILDTYPE] describes what the child chunk contains, e.g. “Obstacles”
[INDEX] is a numeric identifier - Data tables
DT_[LEVELNAME]_Chunks
[LEVELNAME] is the name of the level/environment
How to Use RouteMgr
Making a procedural level
Step 1 – Set up your persistent world
Starting from a new level, set up your environment, such as skydome, fog and lighting conditions. It’s best for the skylight to be dynamic, as the geometry it will light will be in sub-level chunks. Add a BP_FollowingOcean at 0,0,0. Any horizon geometry such as mountains should be attached to the BP_FollowingOcean, either as new child components or as child actors. This is your persistent level.

Step 2 – Create chunk sub-levels
Create a new level asset. In the Levels panel, add your new level as a sub-level.

Design your chunk level as an individual island. Make sure you are adding actors to the sub-level and not to the persistent level. (You might find it helpful to change the 2nd column of the World Outliner panel to show the parent levels of the listed actors.)
You can always open the sub-level individually, to see it in isolation. (But note that the skylight will not be there, as it is part of the persistent world.)

You have an important choice here: you can make all of your chunks relative to the same sea-level, in which case, all of your stitch points will be around the same height above sea level. Alternatively, you can design chunks with varying heights above sea level, so that the path through the chunk starts low and ends high, or vice versa. The edges of landscapes and other geometry should be well below sea level, especially if the chunk might appear at different heights.
Repeat this step until you have a number of chunk levels prepared as sub-levels.
Step 3 – adding RouteMgr actors
In your persistent world, add a BP_RouteMgr. If you have designed your chunks to be at different heights, make sure StitchZ is checked and enter the Z height of your ocean in SeaLevelZ. If your chunks are designed to all be at the same height, StitchZ should be unchecked.
In each chunk sub-level, add two BP_RouteNode_StitchPoint actors. The stitch points should be placed at the entry and exit point of the chunk, where you would wish the paths to connect, with the arrow pointing outwards from the chunk.
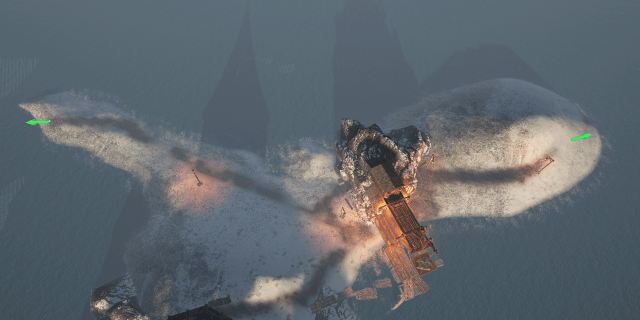
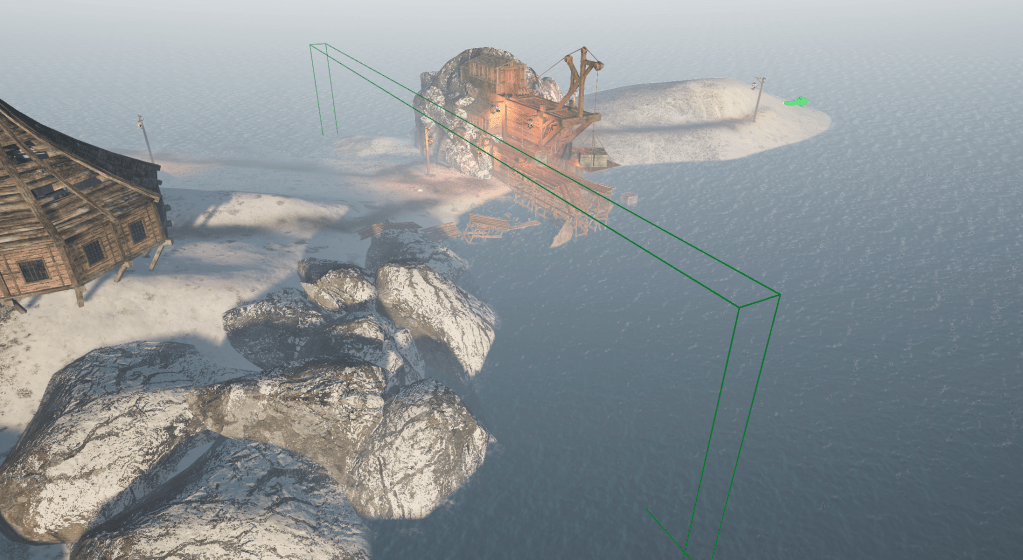
Add a BP_RouteTrigger to each chunk. It should stretch accross the whole chunk so that it can’t be bypassed. It should be placed near the middle (and where possible, if it is at a place where the player’s view is obscured, it will help to reduce potential pop-in).
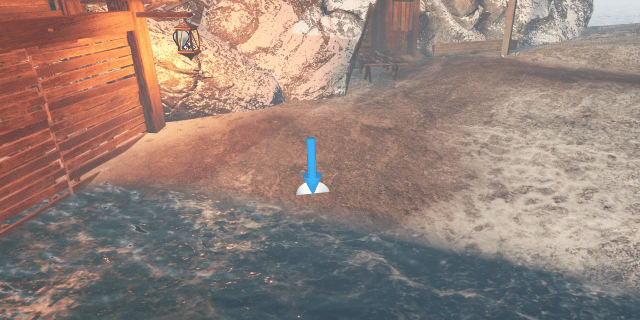
If you have designed your chunks to appear at different heights, then you may also need to place a BP_RouteNode_LowPoint in some chunks. When the chunks could be a different heights, if the path dips downward between the stitch points, that point could end up under water. In that case, add a BP_RouteNode_LowPoint within about 50cm of the lowest point you expect the player to be able to go. At the point of choosing a new chunk to load, if any of the nodes would be under water, that chunk will be ignored for selection. If your chunks are to be loaded all at the same height, or if one of the stitch point nodes is already at the lowest point, then you can skip this part.
Step 4 – set up the ChunkInfo data
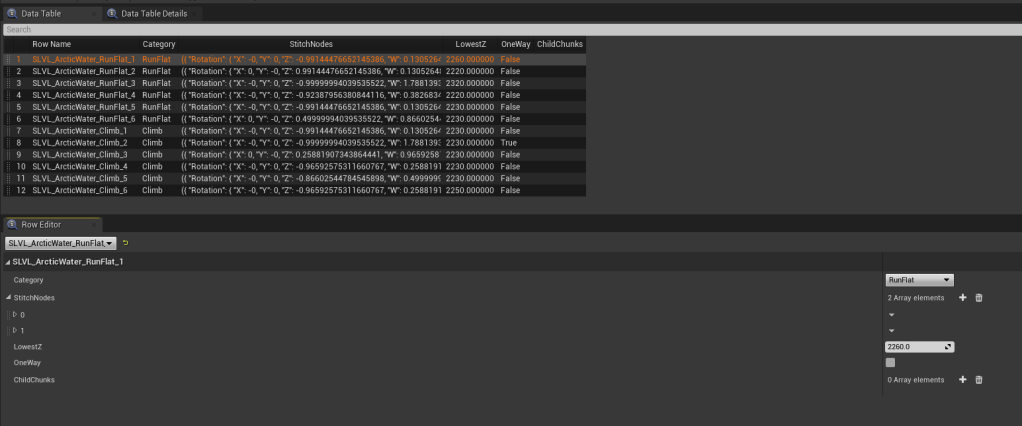
Create a new data table with the S_ChunkInfo struct as a basis. (Or if you prefer, duplicate an existing one.) Each row in the data table will represent a chunk sub-level.
Make sure the ChunkData parameter of your BP_RouteMgr is pointing to the data table you just created. WBP_ChunkTool is a WIP tool to automate the next step. For now this must be done manually.
Using ChunkTool
Open all of your sub-level chunks and make them all visible the levels panel.
Right-click WBP_ChunkTool and choose “Run Editor Utility Widget”.
In the window that opens, choose “Add Chunks”.
Any chunks that are loaded and visible, will be added to the data table specified in your BP_RouteMgr. Any chunks that already exist will be updated.
You may need to edit the data table manually to add any child chunks, or specify categories or one-way chunks.
Without ChunkTool
Open the data table.
Use the “+” button to add a new row. The name of the row must match the name of the sub-level asset for the chunk.
The third column, StitchNodes, should contain an array of two transforms. The transforms should match the transforms of the stitch nodes in the chunk. You can copy/paste the location and rotation.
If your chunks have multiple heights, the fourth column should list the lowest Z location of a node in each chunk. If all your levels are at the same height, you can ignore this column.
Additionally, you can add any child chunks, or specify categories or one-way chunks.
Make sure all your files are saved. (In PIE, streamed chunks will be loaded from disk, so unsaved changes won’t be visible.) Your procedural route should now be ready to test.
Making a sequential level
RouteMgr can also be used to stream an authored level in sequential chunks.
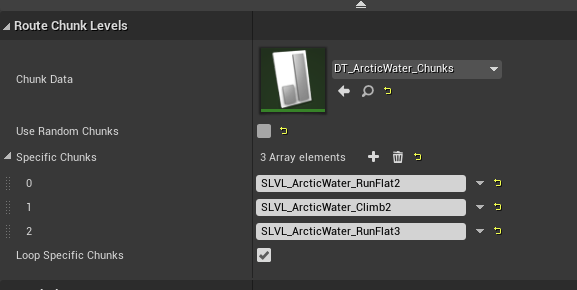
Select your BP_RouteMgr. In the details panel, uncheck UseRandomChunks, and add sub-level names, in order, to SpecificChunks. You can also chose whether or not to make them loop.
Scripting route spawning
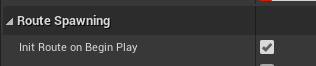
Be default, route spawning happens on BeginPlay. You can deactivate this if you want to script it in another way. Just uncheck InitRouteOnBeginPlay on the BP_RouteMgr.
Adding child chunks
Child chunks can be overlayed over parent chunks to add additional detail or to provide variation in obstacles or other geometry. Multiple child chunks can be listed and one will be selected at random.
To create a child-chunk, move your optional geometry into a different sub-level.
Manually edit the chunks data table and in the ChildChunks column, add an array of names of potential child chunks for this parent chunk.
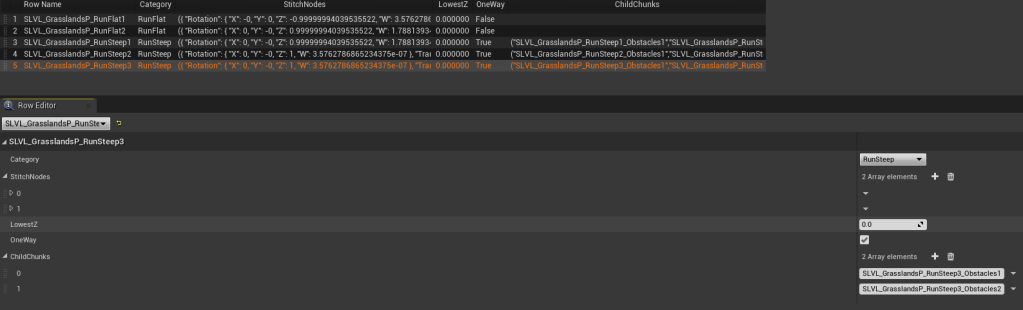
The child chunk sub-levels will be given exactly the same transform as their parent.
TO DO: There will be two ChildChunks lists: ChildChunks_OneWay and ChildChunks_TwoWay. One way child chunks will force their parent chunks to be treated as one-way if selected.
Troubleshooting
Some chunks appear under sea level
Make sure StitchZ and SeaLevelZ are set properly on the BP_RouteMgr. Make sure that the nodes actors and/or the LowestZ listing in the data table represent realistic values for the lowest heigh in each chunk, and that these numbers are above SeaLevelZ.
Chunks load in overlapped
Make sure the stitch nodes and/or the node transforms in the data table have been set, including the rotations. If you have set StitchingYawVariance to anything other than zero, try reducing it.
Chunks or child chunks are not loading
Check the output log. If you see “BP_RouteMgr failed to load chunk level: xxxxx” or “BP_RouteMgr could not find level info in data table: xxxxx” check that xxxxx matches the actual name of the sub-level asset. If not, you might need to correct it in the data table.
A specific chunk appears infrequently / seems not to appear at all
Make sure it’s been included in the data table. Check the category of the chunk as specified in the data table HeroSection chunks will not appear as part of the procedural rotation, only when listed in SpecificChunks. If you are using StitchZ, it’s possible that the chunk doesn’t often fit above sea level, maybe because the far away node would put you below water. In that case you could try making the level flatter or including more levels with an upward path, to create more space.

Leave a comment