
Often you may find yourself having a bipedal character such as monster characters and such and there might not be enough animation assets for it. Adding to that its skeleton does not coincide with the default UE4 mannequin’s one and so you can’t just share the animation assets between them. There is a solution tough, you can attempt at retarget the animations that you have for the default mannequin onto your character.
This is a walk through, step by step, showing how you can retarget animations that are rigged for the UE4 default mannequin onto a different bipedal skeleton.
1 – Preparing the skeleton assets for retargeting
First thing you need to do is to check if both your skeleton assets are ready for retargeting.
For that you need to:
- Open both skeleton assets.
- Go to retarget manager.
- Set up their rigs: choose humanoid.
- On the non-default skeleton you may need to set up the root-target correspondence: choose the appropriate bone (if one exists) for each of the targets provided.
- Important: make sure that both of them have matching poses be it A-Pose or T-Pose. You can change them at “Manage Retarget Base Pose” below “Set up Rig”.
The rig that was just setup is meant to make the bridge between the source skeleton bones and the target skeleton one’s.
Figure 1 shows how the end result should look like with both skeletons doing an A-Pose.

2 – Retargeting the animation asset
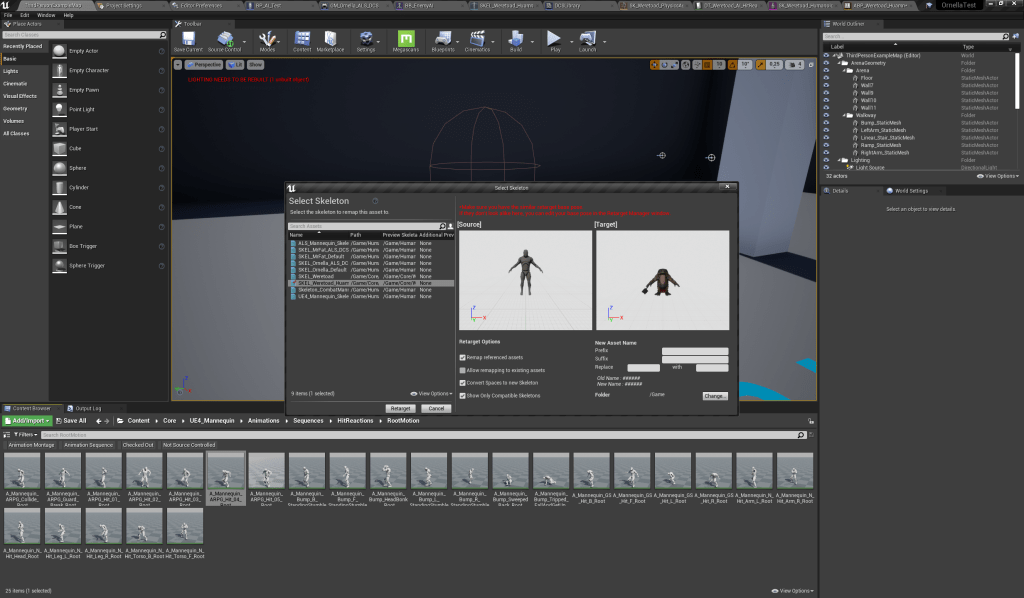
After this you may go to an animation asset of your choice, can be anything be it aim-offset, blend space, blueprint, montage, or sequence. You click with the right mouse button, select “Retarget Anim Assets” and then “Duplicate Anim Assets and Retarget”. You’ll be presented with a similar window as the on in Figure 2
On this window you can then select your target skeleton and after selecting it you may notice that both meshes should be doing the same pose. There’s a red warning to remind you of it. You can also add extra task to do such as adding prefixes, suffixes, replace parts of the asset name for another name and even select the folder on which you want the new asset to be saved in.
After the process is done you can then open the new asset that was just created and check the result. It is likely that the result might look like something on the below video where the mesh seems to be horribly distorted. What gives?
On the above video we see the superposition of the non-retargeted skeleton animations (in yellow) while in white is the retargeted animation.
3 – Retargeting options
There is another step that was omitted previously to show what can go wrong during retargeting and on how to try and fix it. That step is setting up the retargeting options. If the rig is meant to bridge one skeleton bones to the other the retargeting options are meant to tell on how to deal with the animation information that was just retargeted.
On the skeleton asset click “Options” and then “Show Retargeting Options”, see Figure 3.
There are multiple options available but following Epic Games’ guidelines as a rule of thumb we do the following setup:
- The root bone (the first bone in the chain), weapon and cloth bones (if available), IK bones and other markers are meant to use the “Animation” option.
- The pelvis bone (or another that has the same purpose) will be set as “Animation Scaled”.
- The remaining bones use the “Skeleton” option.
For a fast setup do it like this:
- Right click the root bone and select “Recursively Set Translation Retargeting Skeleton”.
- Then find the pelvis bone or equivalent and set it to “Animation Scaled”.
- Any other bones such as the root bone, weapon or cloth bones, IK bones and markers set them as “Animation”.

Now having all set up you may check again the animation asset that was retargeted and see how those changes affected the animation.
As you can compare with the previous example, on this video the mesh is much less distorted and there is a striking difference between the non-retargeted animation with the retargeted one when they are superimposed.
4 – Remaining issues
There are still two details that on this example require fixing:
- The mesh is being set up below the ground level: this might be due to the root bone on this specific skeleton has an offset being at the same level as the pelvis. When getting retargeted the target root bone gets set up at the source root bone position that is the ground.
- The mouth and tongue still present a bit of an issue: this might be due to a lack of information on how to translate those bones on the source animation.
Both of these issues can be tackled on the animation blueprint.
For root bone height issue one of the fix may be as follows: every time you may want to play the retargeted animation you can apply an offset to the root bone (see Figure 4):
- Add a “Transform (modify) Bone” node to the animation blueprint.
- On the translation pin apply a vector with an offset on Z-axis. To precise on a value you may need to do some trial and error. On this example 100 unreal units worked well.
- On this case we are switching the offset depending on if the retargeted animation is playing or not.
To solve the tongue and mouth issue, on this example there was some animation assets for walking already done for this specific mesh which had the character walk with its mouth closed.
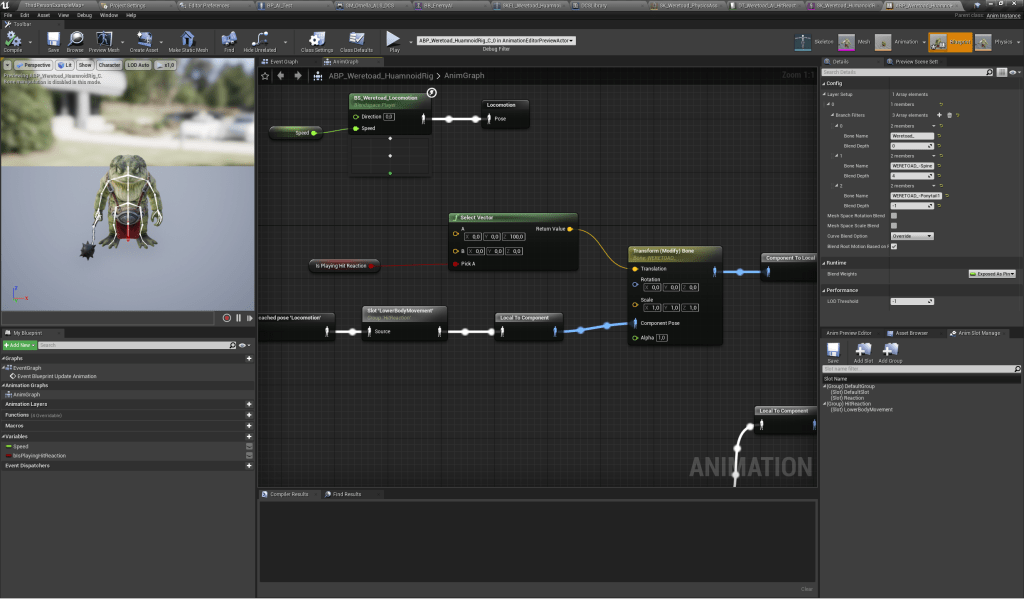
On the animation blueprint we saved this animation as a cached pose (from the animation asset pin write “New saved cache pose” and select it. You can also then rename this new node. Having this saved pose was then just a matter of blending it in onto the other pose your character might be playing (see Figure 5).

As you can check from the above picture there is a “Layered blend per bone” node where two cached poses are being fed in. The one below, second pin, is being layered on top of the one above, first pin, and this one is the saved cache pose with the mouth shut. On the details panel you can check the values that were set in. On the branch filter the “root” bone of the tongue bone chain is being set with a value of -1. What does it mean? It means that the animation data that is being layered on top gets discarded on that bone chain. Meaning that on that chain, which is the one that translates the mouth and tongue, is only being driven by the pose that has the mouth shut.
5 – Conclusion and documentation
Thus this concludes the tutorial. Albeit not covering all of the issues that may arise it gives the basis for you to tackle them and see on how to try different solutions to solve them as soon as they appear.
For further references see the following links to Epic Games’ documentation on the subject:

Leave a comment