- Download Unreal Engine 4.25+ from github.
- Follow instructions from Epic Games github (download pre-requisites, setup.bat, generateprojectfiles.bat).
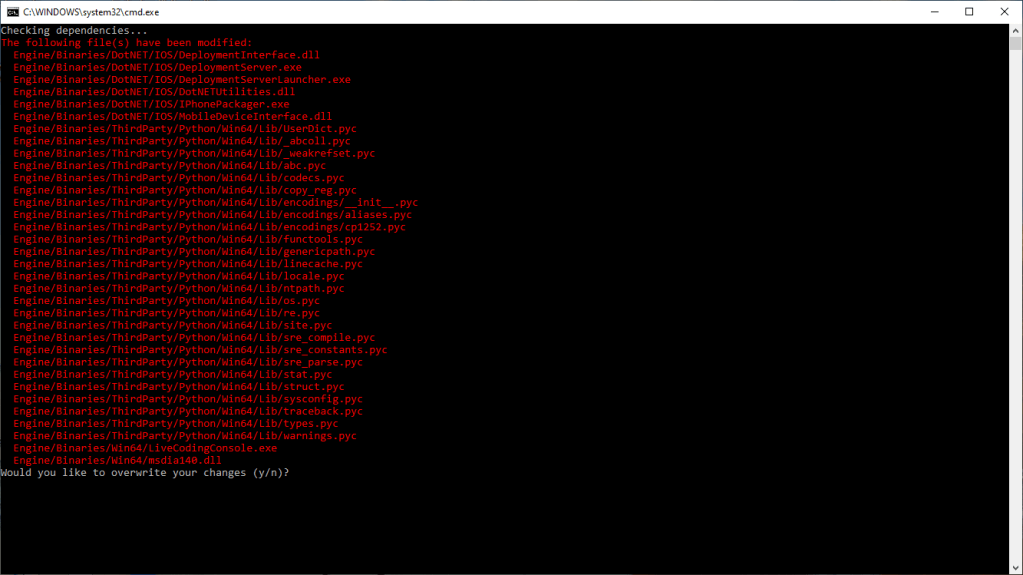
- Build Development Editor by opening the sln file in visual studio. Should take about 1-2 hours.
- Unzip marketplace.rar file and move marketplace folder into new unreal engine install location

5. Build development editor again (should just take 5 mins this time).
New Project Steps
- Make a new project
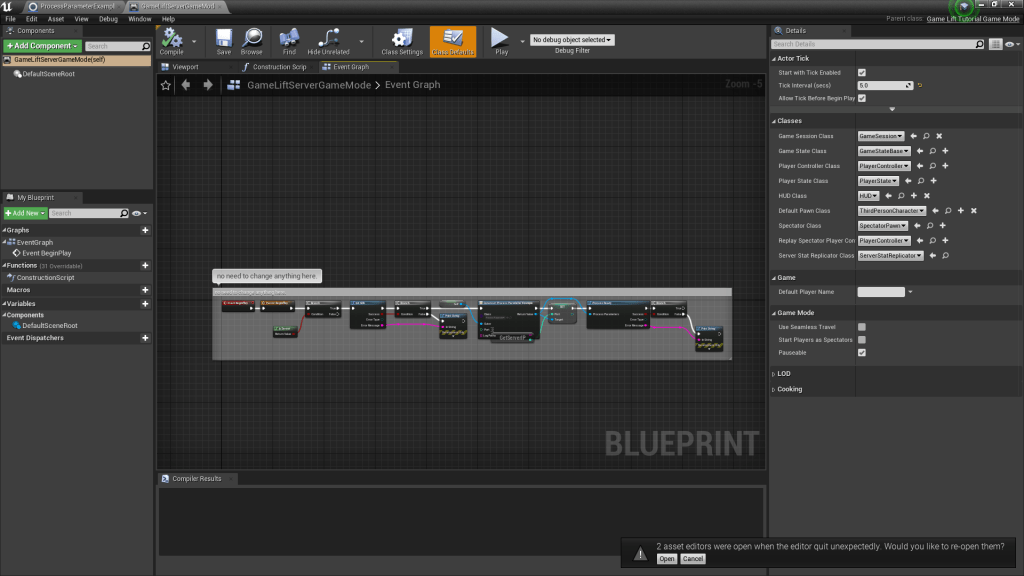
- Create a server target by duplicating PnameEditorTarget.cs in project source and changing it to PnameServerTarget.cs and changing the c++ contents also to be named PnameServerTarget.cs
There are two starter tutorials to consider:
Implementing Gamelift Into A New Project
The first of these two tutorials gives an overview on implementing gamelift into a new project completely from scratch.
Consider that in project settings, the server default map needs to be set and this is the map the server will enter into. The client enters into the map called EntryMap, a different entry point than the server.
I suggest watching this tutorial to understand the different parts of what is going on, but starting from the gamelift only starter project instead of recreating it yourself.
Starting From The Gamelift Only Starter Project:
https://mega.nz/file/2OhGnIzL#qCJ93Rt3102cAYBkJ_4kK4mVwAxCA6TnWUn150UHpBM
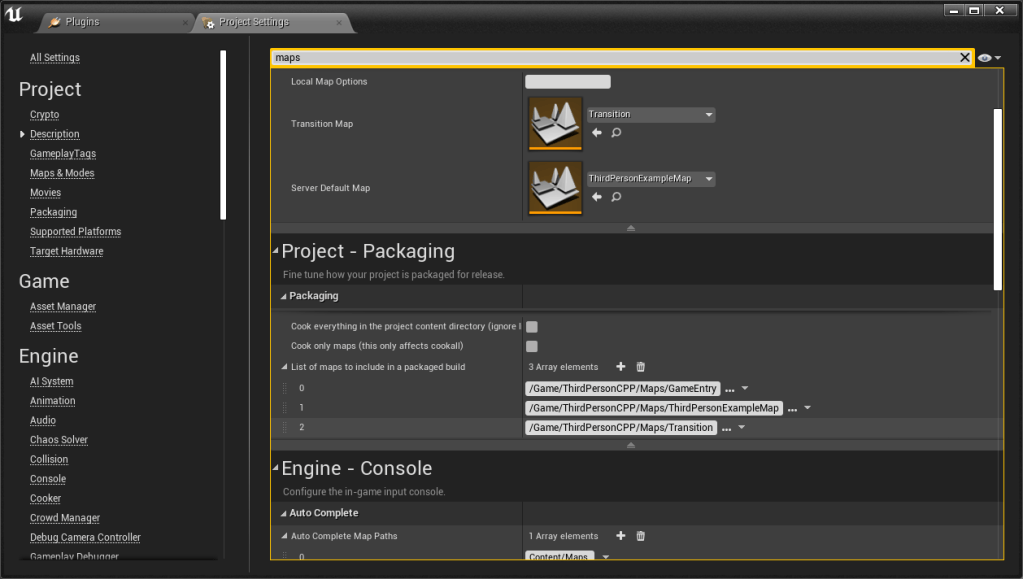
Also important to make sure maps are included in packaged project–Gamelift Only Sample Project shows these as included already by default also.
After building, dedicated servers appear in the saved>>staged builds directory

The next step involves uploading a build to aws gamelift which requires the aws CLI tool.
For our purposes we also want to create builds in linux, which requires installing some tools to create ue4 dedicated server builds in linux.
For this, we will investigate this tutorial: https://medium.com/swlh/building-and-hosting-an-unreal-engine-dedicated-server-with-aws-and-docker-75317780c567
This tutorial mentions first installing a clang pre-requisite, for our version we use unreal 4.25, so this is available to download and install here.
https://docs.unrealengine.com/4.26/en-US/SharingAndReleasing/Linux/GettingStarted/
With the clang pre-requisite installed, now is the time to try and see if we can build to a specific running linux instance from within the project launcher window.
By default it does not appear here.

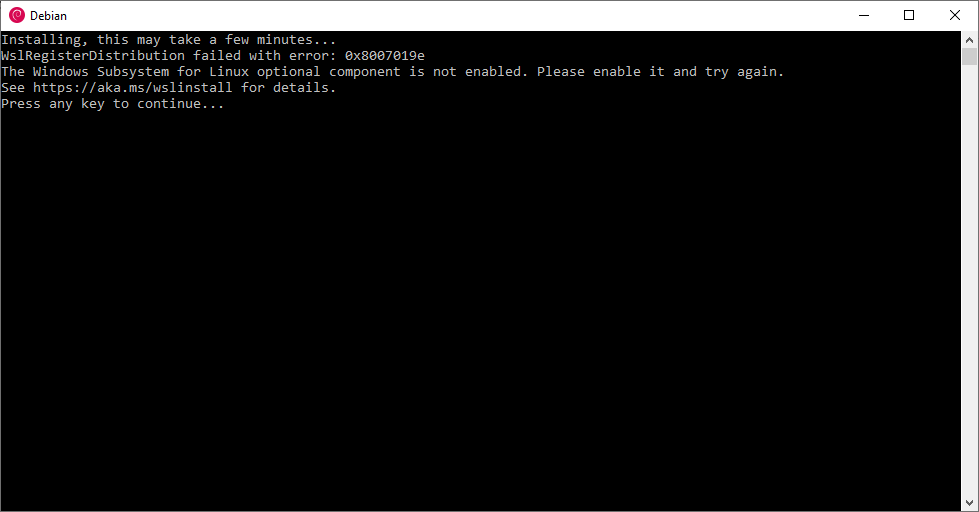
For doing this and getting a linux platform to appear here, I was advised to run a linux shell by installing debian from the windows store. First opening it returns this error–checking into it.
Here is the site they are referring to:
https://docs.microsoft.com/en-us/windows/wsl/install-win10
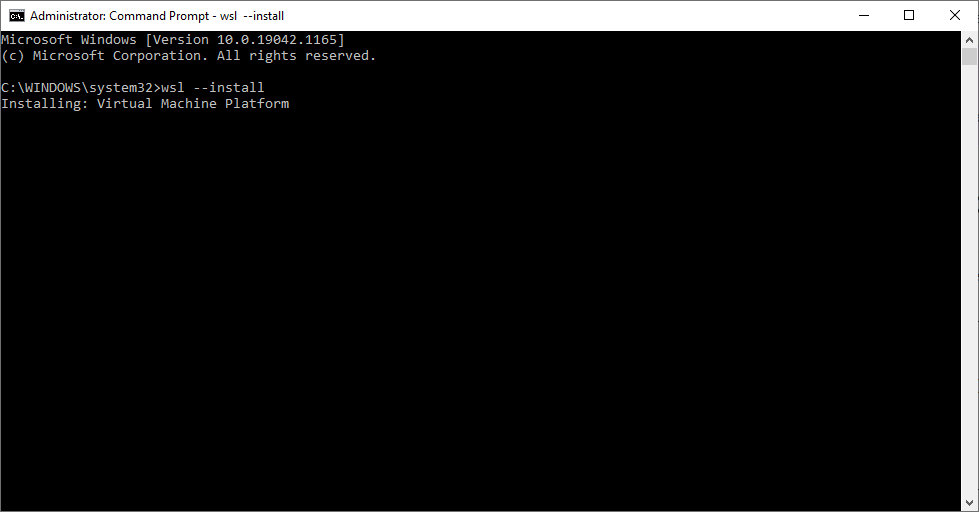
I decided to try a simplified install.
It appears to have worked :).

After restarting, it appears an error popped up in Ubuntu–this will require investigation.

Perhaps this installation failed because I didn’t join the windows insider program and install a test windows build. For now I will put this on the backlog and see if I can progress making dedicated server linux builds for uploading to AWS but package windows builds for testing with my local gamelift.
After speaking with Atanas–we think it’s likely an easier fix to enable this in my bios settings and I won’t need to join the windows insider program.
If I need to return to creating a linux environment for building the project and doing local gamelift testing, I can return to this video tutorial here https://www.youtube.com/watch?v=ZRl_P8Q5_fI
Here on the next step, I have I am packaging and building the gamelift only sample project for windows from the project launcher.
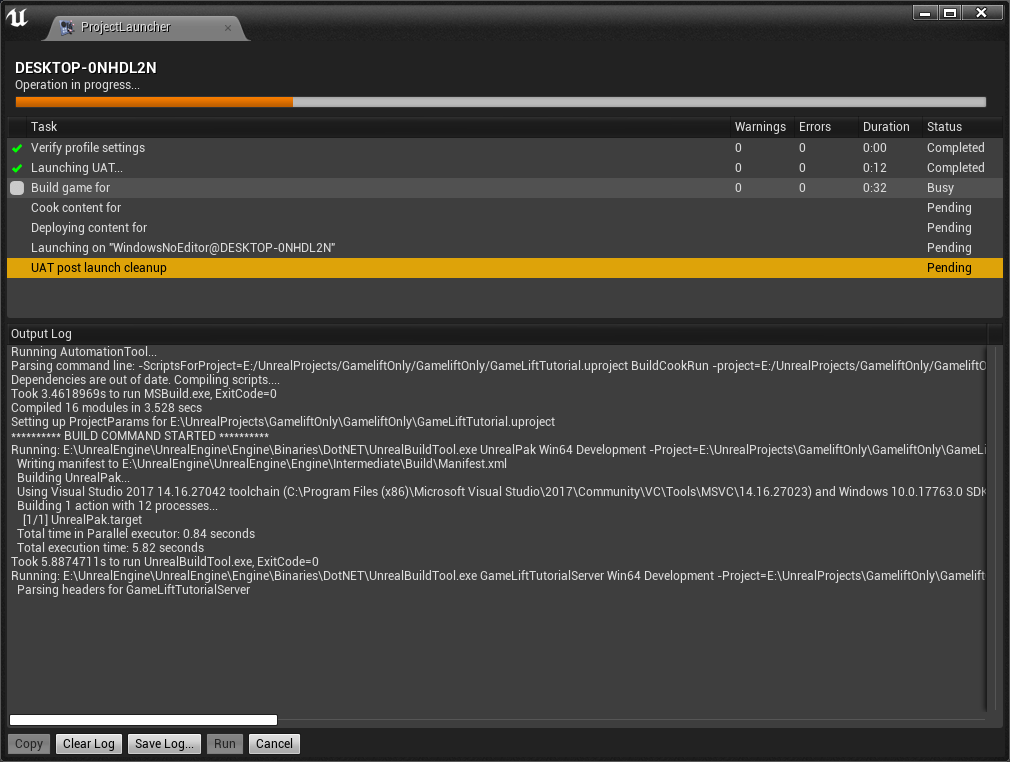
Now after packaging, it is time to upload this build with the amazon command line tools.
First step after downloading the command line tools is to configure my aws environment with access key, secret key, and default region (eu-west-2) and default format (json).
Next is doing the actual upload in the command line.
aws gamelift upload-build –name –build-version –build-root –operating-system WINDOWS_2012 –region eu-west-2
We modify this to be:
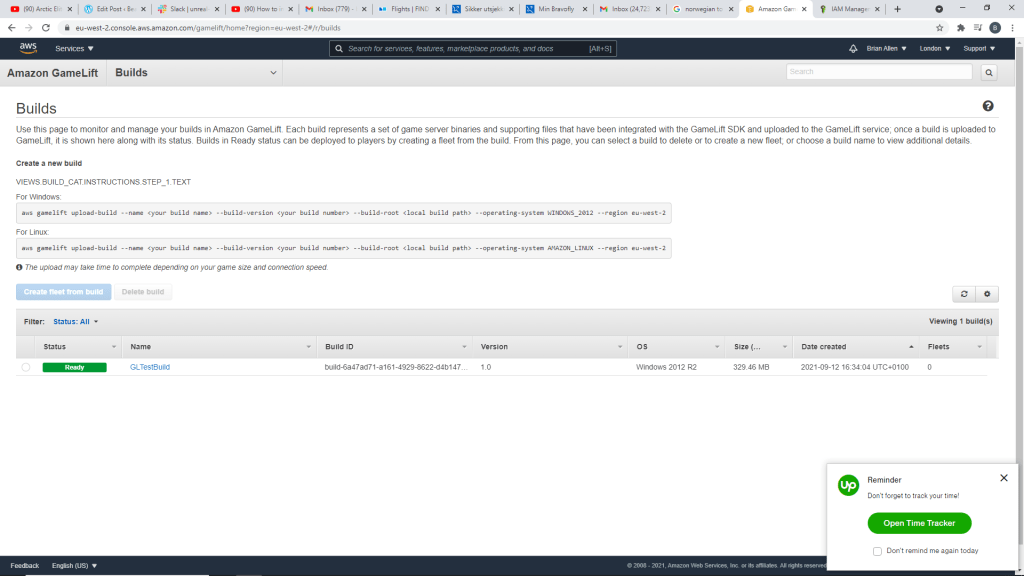
aws gamelift upload-build –name “GLTestBuild” –build-version 1.0 –build-root “E:\UnrealProjects\GameliftOnly\GameliftOnly\Saved\StagedBuilds\WindowsServer” –operating-system WINDOWS_2012 –region eu-west-2
Now after some patience, it is uploaded. Next step is to create a fleet from this build!
For specifying the build path, from a full string of this where GameLiftTutorial is the project name
E:\UnrealProjects\GameliftOnly\GameliftOnly\Saved\StagedBuilds\WindowsServer\GameLiftTutorial\Binaries\Win64
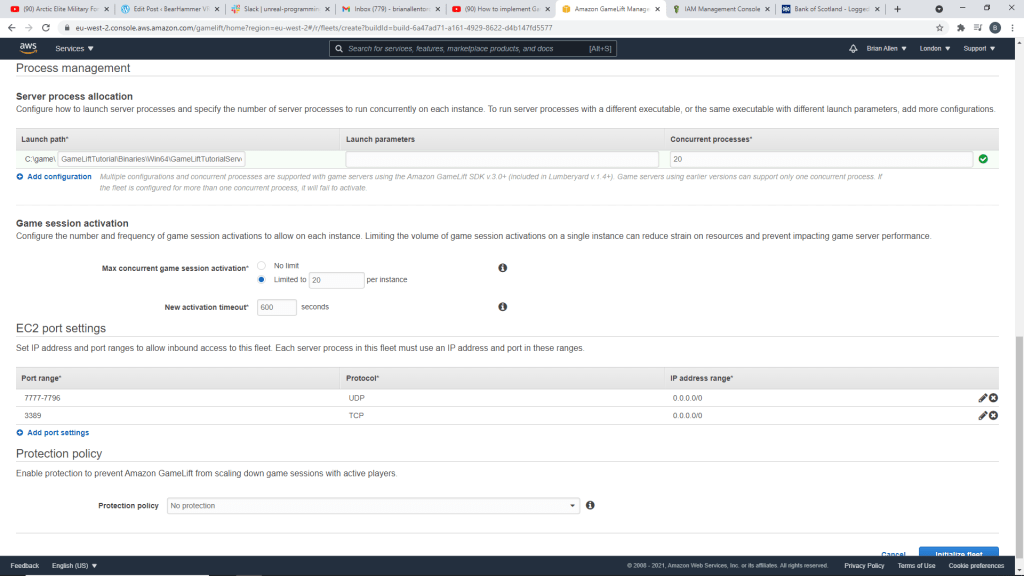
You specify just
GameLiftTutorial\Binaries\Win64\GameLiftTutorialServer.exe and set concurrent processes to 20 for testing (which means 20 players).

Configure the ec2 port settings as per this image.
Now it’s time to go back to that sample project and update our configurable variables for connecting to Gamelift.
Opening the GameEntry map and opening the level blueprint, we can see two well organized sections for aws local and aws online respectively.
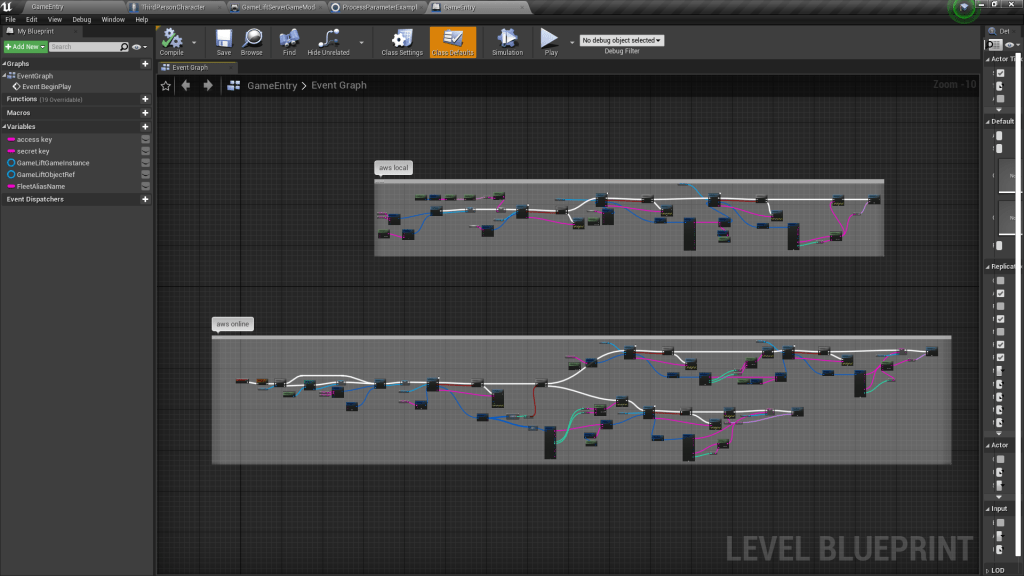
Here we edit the access key, secret key, and region.
The next step is to edit the fleet alias name variable which connects into the Create Game Session event with our fleet name from the aws gamelift console.
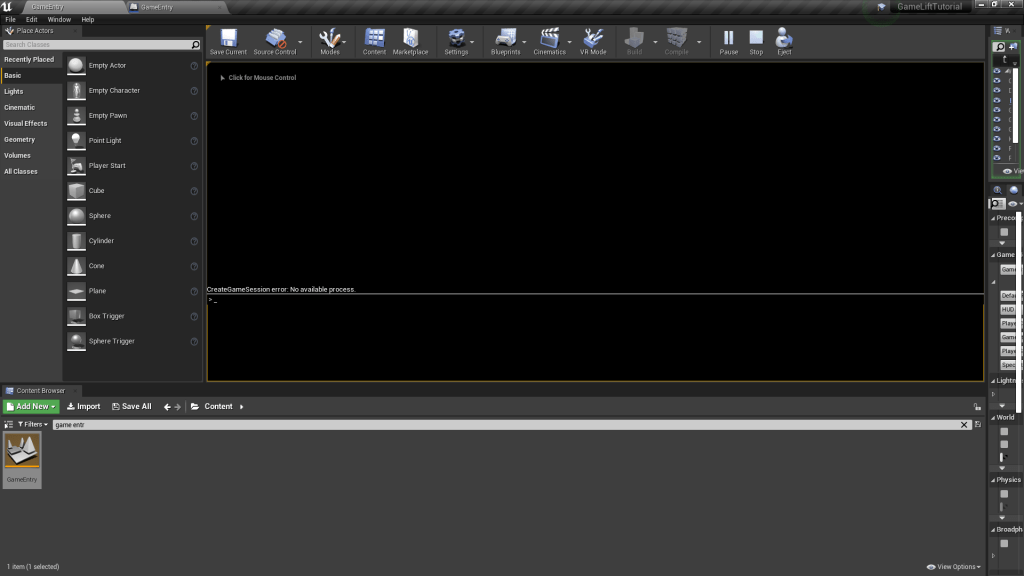
Now I attempt to play on this new fleet by hitting play in the editor, but we can see from the print string a friendly error message showing that the fleet is not yet active but is still activating.
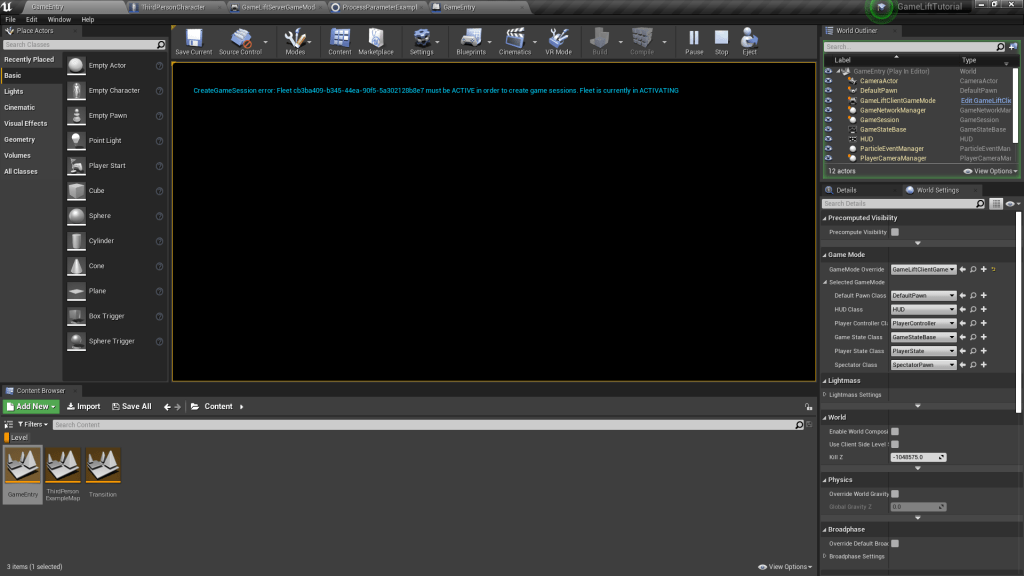
This ended up having an error that prevented starting the fleet. After testing locally it did not seem to connect new players either, but the gamelift SDK running locally did appear to detect the server exe being opened and said it had healthy processes. It’s possible I missed something there.
For running windows builds, the developers of the gamelift blueprint plugin did mention it was necessary to include specific windows files.
But for now, I decided to march on with Linux instead as recommended by Atanas.
I found this very useful article for enabling virtualization on my machine.
How to Enable Virtualization on Windows 10
After doing this, I successfully got debian to install.
Now my next steps are packaging a linux build and running aws locally in linux to test it.
I was recommended to follow this tutorial by the developers of the plugin:
Following this silent tutorial I reached a point of no return where installing openssh-server did not seem to proceed.
This led me to find this other tutorial which I will now be considering.
Atanas sent me some commands to try out for installing ssh server, so I will test those out first before going through this tutorial.
sudo apt updatesudo apt upgrade- sudo apt-get install openssh-server
- sudo service ssh start (to run the ssh server)
- sudo service ssh stop
- sudo service ssh status
Using these commands, I was able to start an ssh server. The How to Build Linux Server with WSL tutorial then shows I need to run a command ip a to find the ip address of this server.
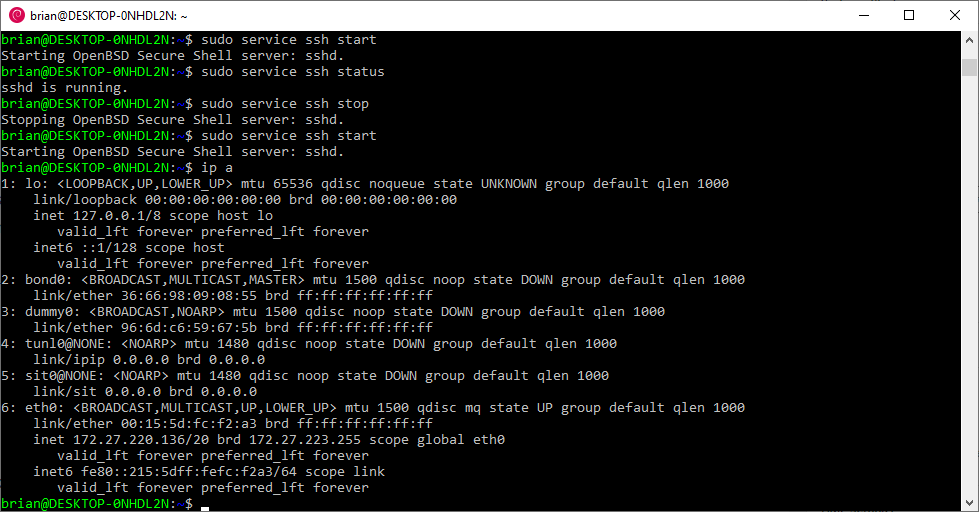
127.0.0.1/8
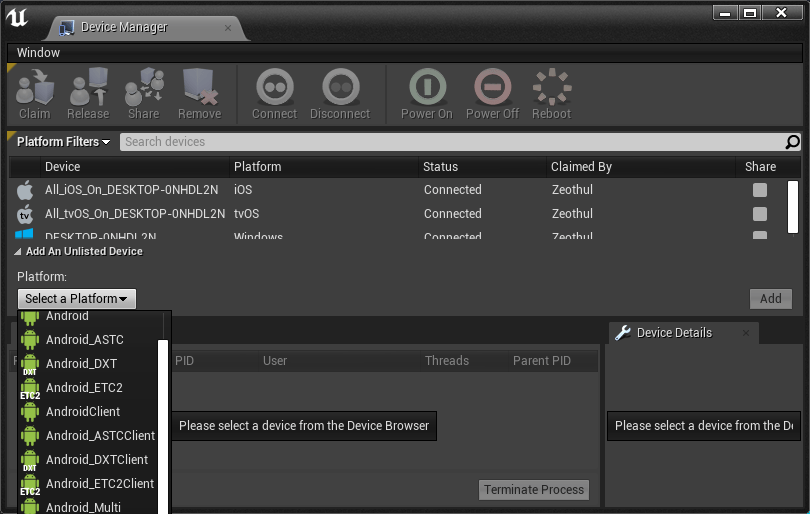
The next step in the tutorial shows I need to add an unlisted linux platform as an option from the device manager, but I am not seeing this available on the drop down.
Although I have installed the linux clang, this potentially is not appearing because we are missing some additional steps of configuring environment variables.
It seems like the environment variable was set automatically, but watching this tutorial video showed me I need to build the engine again after installing the linux clang.
After rebuilding the engine, now I see the options for adding linux from the device browser.
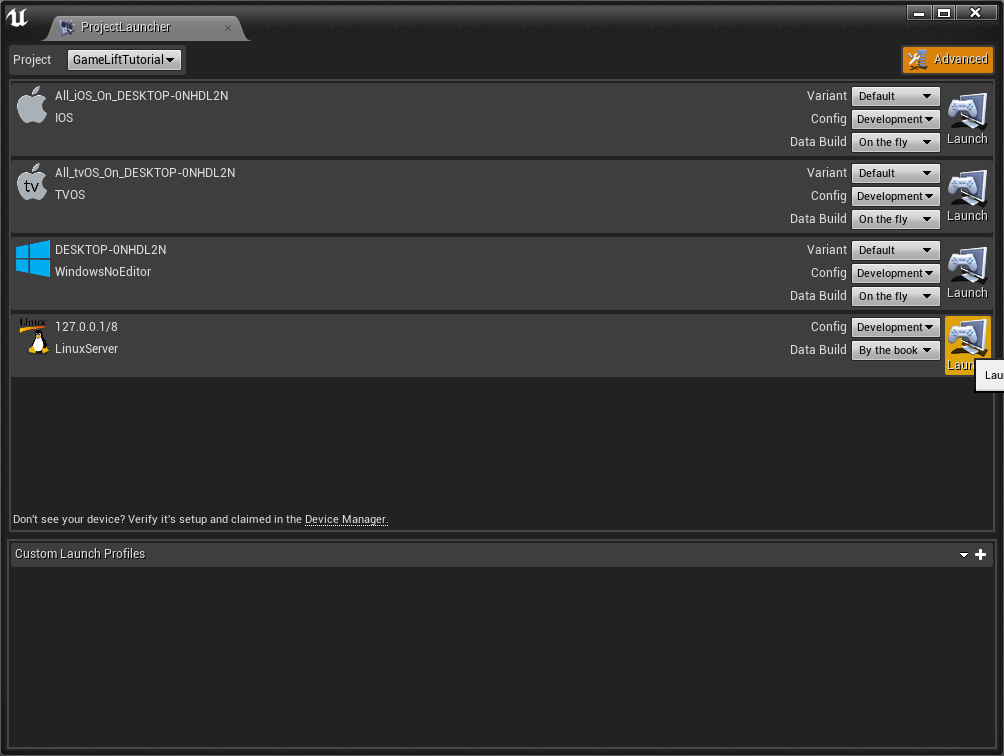
I have entered the ip address of my linux ssh server and for the username and password I put the username and password I had entered for debian and the ssh server.

Now it’s time to try building the project from Project Launcher, making sure to select by the book for the data build option.
The build failed on this step, so from the windows terminal I connect now to the ssh that is running in debian.

I ran into errors building the project when setting the ip for 127.0.0.1/8 and also for 127.0.0.1.
This error seems more promising to fix.

This post seems to suggest I need to re-run setup.bat
https://answers.unrealengine.com/questions/542062/linux-cross-compile-visual-studio-error.html
Further searching on the error I found that some suggestions on the discord for the plugin were to update the version of putty that is included on unreal engine.
I have attempted to update the putty files here and will try re-running the linux build process.

This appears to have made some progress..building a linux server build now!
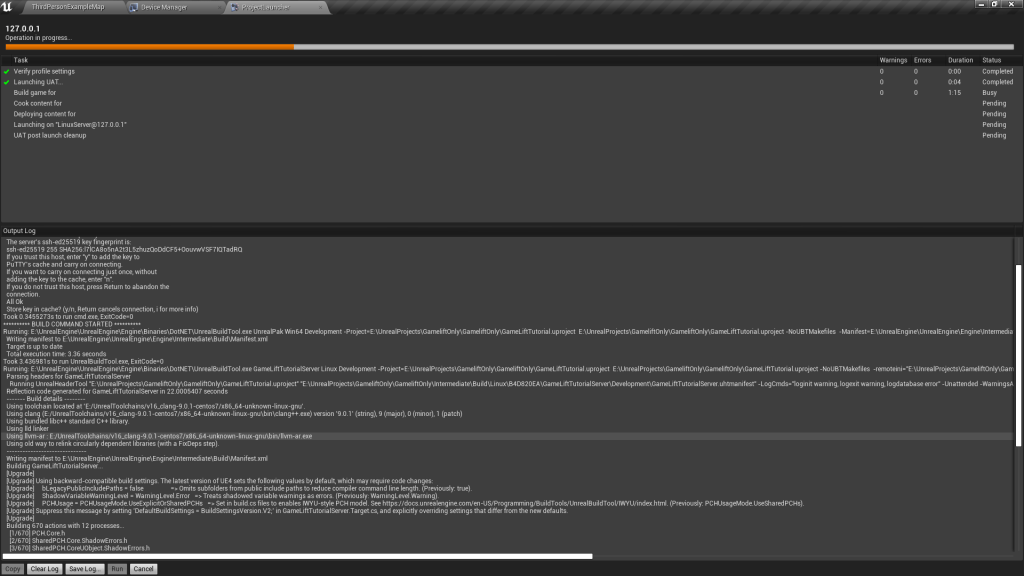
The process appears to fail at the end, but these error messages can be ignored.
The next step is to run on windows command line the gamelift Local server with this command java -jar GameLiftLocal.jar. This opens Gamelift Local to start looking for servers.
Then we need to go this directory for finding our new linux server build:
E:\UnrealProjects\GameliftOnly\GameliftOnly\Saved\StagedBuilds\LinuxServer\GameLiftTutorial\Binaries\Linux
Along the way, in the image below I learned some things about navigating to this path in linux. The linux server can access the windows directories via its mnt directory from its file root.

Unfortunately here you can see I have an error running the command ./GameLiftTutorialServer that it is not opening the server and running into an error.
After searching, the fix for this error suggested:
“make sure you have put your project and unreal engine source in different partition and the plugin in unreal source engine. because of a bug of windows cpp linker, windows will just link a relative path to the binary in unreal engine to executable if they are in the same partition” which I have interpreted to put my project files on D drive while keeping my engine source on E drive.
After this, it did not fix the bug so I am attempting to rebuild the project from the d drive.
Re-building the project from the d-drive worked, but then launching the server gave this error.

Discussing with Lion from the plugin team (very helpful), he suggested that this might be blocked by windows firewall. Disabling windows defender is not enough, but I will need to modify regedit.
“you need to modify the regedit table on windows to terminate windows firewall. turning off windows defender will just allow all income from network. not included dbus”
He also gave some helpful advice that it can be useful to have a separate linux PC to do this kind of testing or can be also useful to develop on mac for avoiding the need to run a virtual machine for doing so. Food for thought!
He also gave some advice that it is possible to retrieve logs from the gamelift game session consoles, but only for terminated game sessions.

Next Steps From Here
So I have almost arrived at the end of my journey of running on a local linux virtual machine an ue4 linux server build which I can monitor on aws gamelift local.
The next steps for me will be disabling the firewall as suggested with regedit and then attempting this again.
As a recap for myself now that I almost have a built thing ready to go, after restarting my computer I will need to:
A. Open debian and run these commands
sudo service ssh start (to run the ssh server)
sudo service ssh stop
sudo service ssh status
B. Connect to debian from windows command prompt with ssh brian@127.0.0.1
C. In the debian command prompt, navigate to the path where you installed the gamelift local sdk with cd /mnt/e/Gamelift/GameLiftLocal-1.0.5 and start Gamelift Local with this command: java -jar GameLiftLocal.jar
D. In a new Debian window, navigate to the Linux Server Build Path
cd/mnt/d/GameliftOnly/GameliftOnly/Saved/StagedBuilds/LinuxServer/GameLiftTutorial/Binaries/Linux/
E. open the linux server with the command .\GameLiftTutorialServer
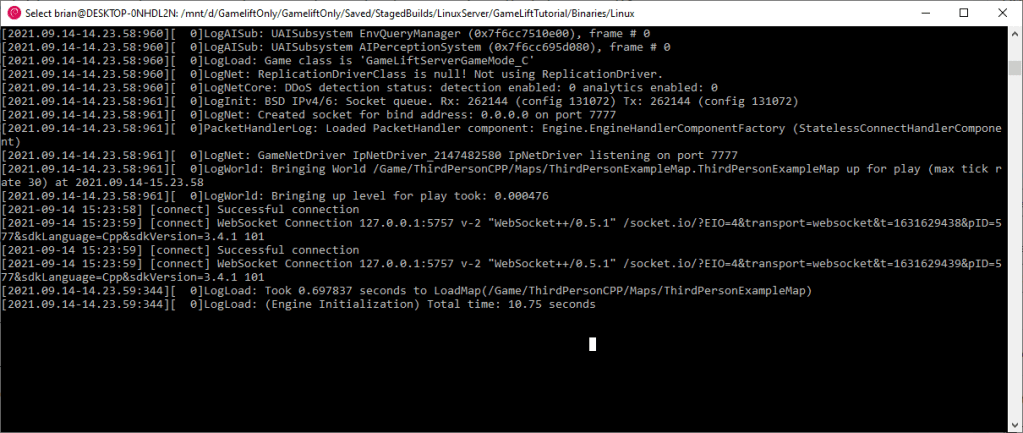
F. Monitor to see if this time it successfully connects to GameLiftLocal.
A successful connection should look like this:
Resuming Progress!
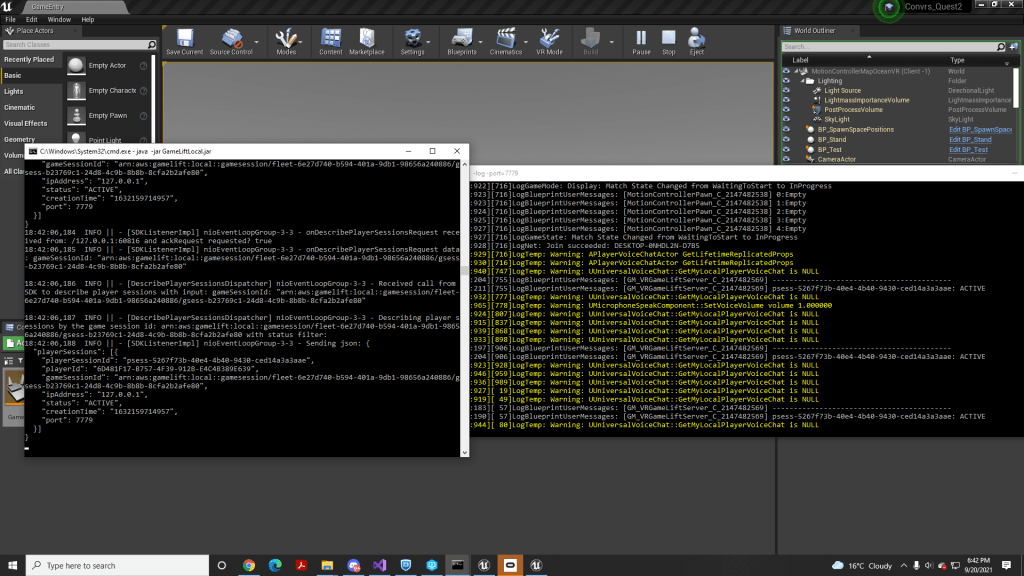
It turns out we did not need to edit firewall settings, our error turned out to be something a bit simpler.
I was opening the gamelift local jar file in a windows command prompt, so the linux server running in the debian environment was not seeing the gamelift local running.
Now the next step is to see if we can connect to the locally running server from either a client build or when playing from the editor.
First step now is to make sure I have changed the game entry map for the client to point its begin play event to the aws local side of things.

There was a small compile error here I had to fix, I’ve renamed the fleet variable name to fleet arm 2.

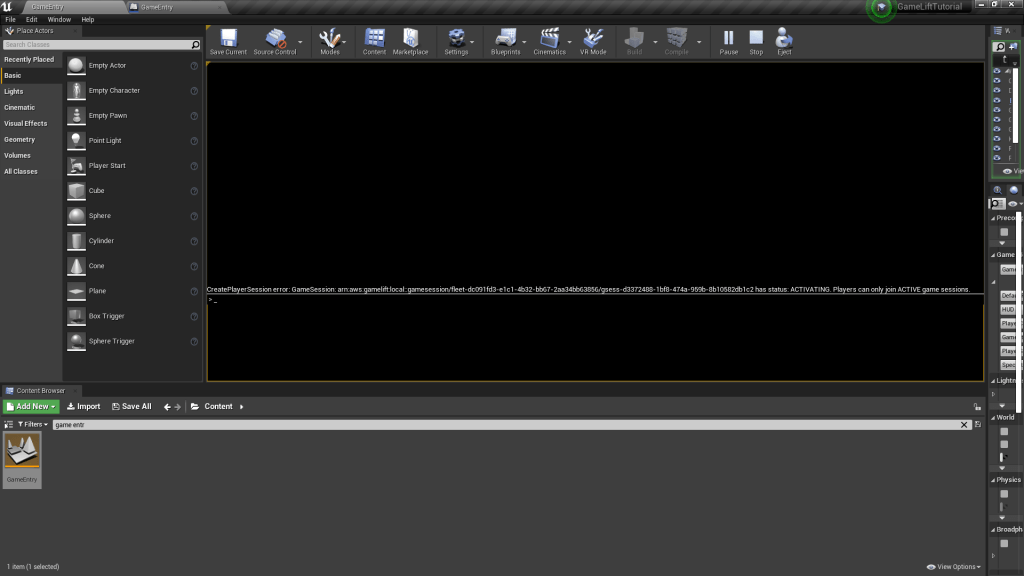
Running this I ran into these errors below when trying to connect, it seems I will need to modify the blueprint code of the gamelift only project and I’ll be reviewing again the tutorials to see if there are any things I missed on this.

Create Player Session Error
When connecting the client again, it says there is no available process. Perhaps it needs to be set to allow more simultaneous processes on the aws local server configuration.
Wednesday
To make sure there are no problems with my environment, I am now testing packaging for linux server a build we know connects.
Thursday/Friday/Sunday
Our results packaging a build we knew 100% worked on my colleague’s computer found us trying lots of different ip addresses from our ipconfig, but still having an issue for the windows client playing from the editor to connect to the gamelift server running in debian.
The next steps now are to:
- Try a tutorial to set up a virtual box environment instead of debian for linux, as there may be better control over network parameters
- If this fails, try running the linux build on another computer on the network and connect to it that way.
I am going through this tutorial now on setting up the Virtual Box.
Lion from the discord support team for the AWS plugin also recommended watching this video, which I’ll watch soon and summarize the learnings from there.
First, I watched Lion’s tutorial video. It was a great overview of the overall Gamelift architecture. When I re-edit this into a more organized tutorial, I think this is the kind of video to definitely put at the beginning.
I learned some great points about configuring autoscaling for your aws fleet and making sure the server is responsible for sending critical data to the aws backend and this is vetted by making sure the IP of the sender is one of the IP’s in the aws fleet of unreal dedicated server processes, not just any client.
Second, I did succeed in getting a virtual box environment set up, but when I go to open the linux server I am running into an issue.

I will investigate this error some more first before abandoning the virtual box set up in favor of trying another pc for hosting the aws local server.
Investigating on discord did not give many leads, so I am going to explore the option of building a dedicated server on windows for my local aws testing, and then later building a linux build to upload to aws.
A while back, Lion messaged me to ask if I had installed the required files for building a windows server build.
I did get the server and gamelift jar working inside the virtual box environment, but in the end ran into the same error we were having with Debian where my windows client was not connecting to the gamelift server.
Monday
I’ve decided to try packaging a windows server to see if I can connect to that.
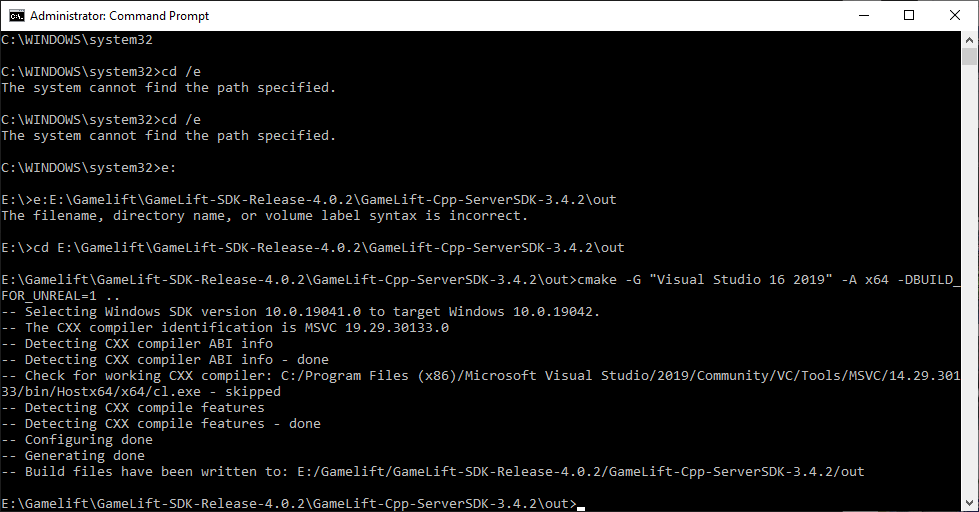
I ran into some errors trying to package the gamelift SDK, so I have started from part 1 of this tutorial series and installed visual studio 2019.
As part of part 2 of this tutorial series, I have installed cmake and set the system path variables for CMAKE and MSBuild and then also set a new system variable for the visual studio 2019 common tools.
running this command in command prompt to build the gamelift sdk.
E:\Gamelift\GameLift-SDK-Release-4.0.2\GameLift-Cpp-ServerSDK-3.4.2\out>cmake -G “Visual Studio 16 2019” -A x64 -DBUILD_FOR_UNREAL=1 ..
Next step:
msbuild ALL_BUILD.vcxproj /p:Configuration=Release
These steps above were for building the SDK, but I realized with the gamelift plugin, we already have a built gamelift SDK in our engine folder, so I fast forwarded past this part and stopped this process.
Beyond this, I resolved an error I had with gameliftlocal.jar not opening anymore on windows by reinstalling java jdk.
I then got the windows server build to open now that I had populated it with the pre requisite installer and the install.bat.
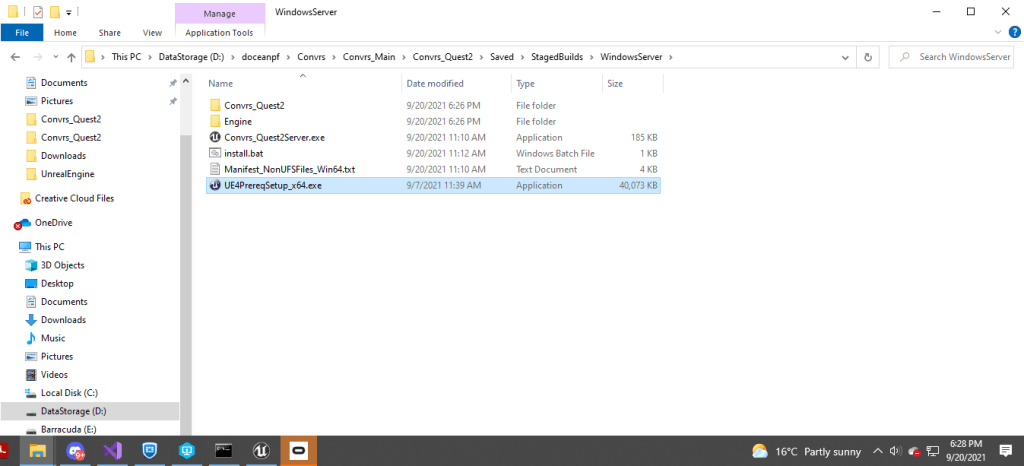
To open the windows server and enable logging, I open it from a cmd prompt with these parameters added. Convrs_Quest2Server.exe -log -port=7779
This makes me wonder if I could add a port as a parameter to the linux server to resolve the problems we were getting.
I am picking up AWS development now at a later time, trying to build a new windows server build, upload that to aws, and then connect to it from a windows client.
The steps I need to follow are:
1. Build windows server build from packaging.
2. Configure the fleet or alias id for both the client and the server.
3. Add the pre-req files for the windows server build in the directory I upload to gamelift.
4. Test connecting to it from a client build or the editor.

Leave a comment