Singularity University is building a diversity training exercise which requires animating full scenes with multiple human characters, including the potential for these human characters to interact with the player or the environment.
To support this development, we are using the following pieces of unreal engine.
- Animation Blueprint
- Level Sequences and Template Sequences
- Blueprint Character
- Animation Slots within Animation Blueprint
- Fabrik IK
- Power IK Plugin
Videos Of Implementation
Level Sequence, Template Sequence, and Blueprint Triggering
A template sequence can be bound to a particular kind of actor, in this case BP_NPCCharacter.
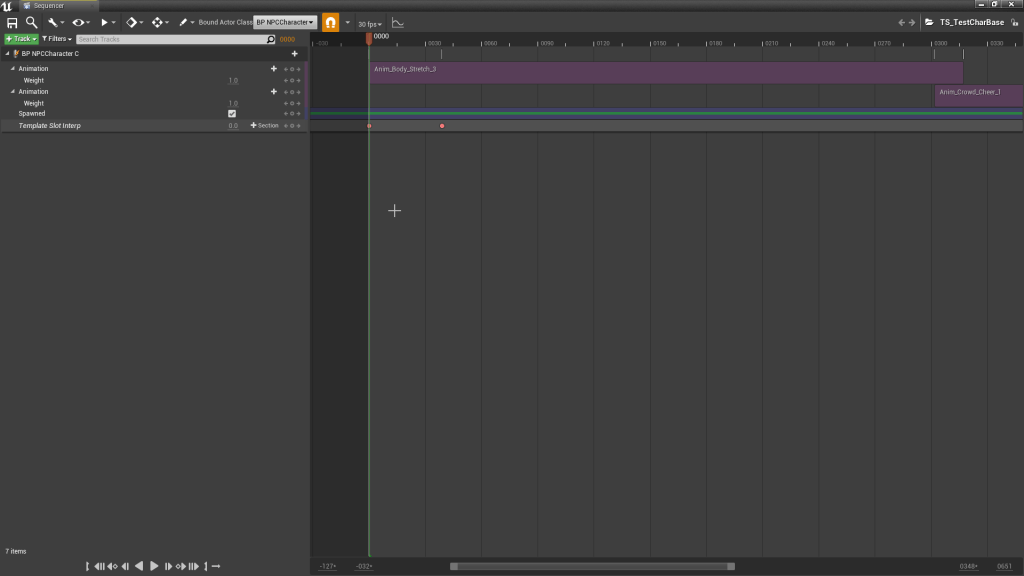
This particular template can be re-used in different level sequences, so an animator can plug in a sequence of static animations.
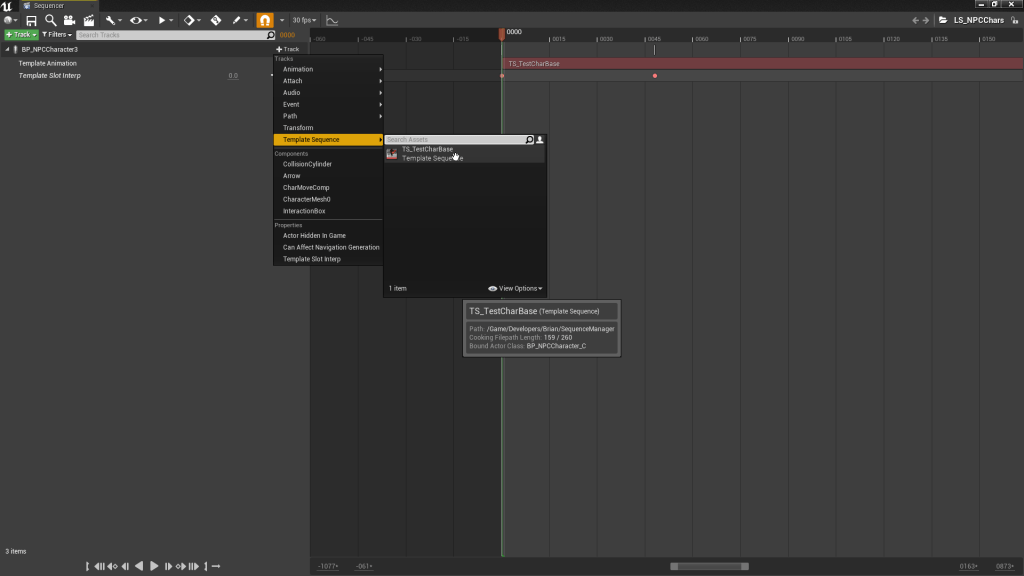
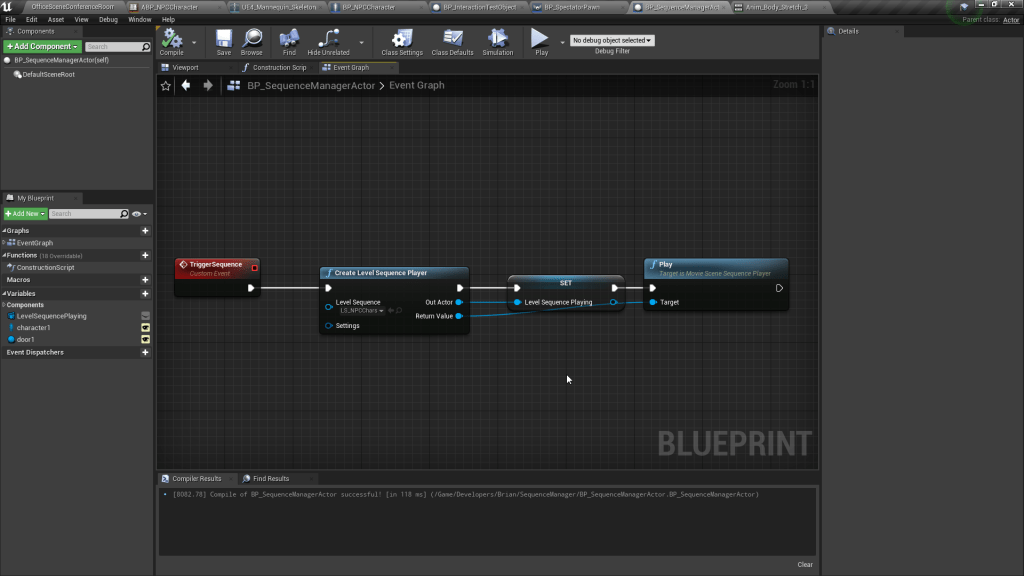
These sequences can be triggered in blueprint, such as this trigger for the specified sequence to play in BP_SequenceManagerActor.
If we were strictly to rely upon animation sequences without an animation blueprint though, we might find ourselves lacking some of the programmatic interaction we would like to add to achieve a believable scene.
Let’s say for example we wanted to create a board room scene with 4 characters seated, looking at a speaking character.
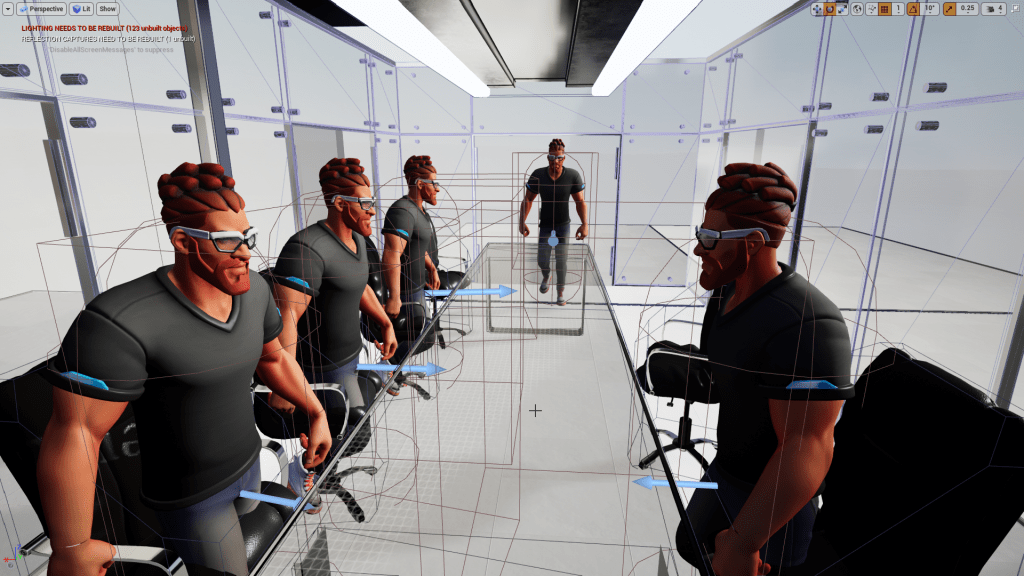
To achieve this purely using sequencer, an animator would need to create custom sequences for each individual character, each with their own different rotations on the head for looking at the speaking character.
Enter the Animation Blueprint & IK Animation
The goal with setting up the animation blueprint for the NPC character is to create an animation blueprint with the flexibility to play triggered animations from the sequence manager but also respond intuitively to the position and actions of the player and actions of the environment.
To achieve this goal, the setup needs to:
1) Track the player head position in VR and animate the eyes and head of the NPC character to follow the player at times when it is appropriate to do so.
2) Allow the NPC to track other objects or NPCs when appropriate to do so (ie, a cue to look at a presentation screen in the environment or another speaking character)
3) Allow the NPC to interact with specified objects when they come within a certain proximity of the NPC. These objects will have an interface defined which returns an Interaction Grip Type, to specify what kind of interaction the NPC should have with the object (should they reach out to grab it with an open palm, grasp it, grab it like a door handle?)
4) Allow the NPC to transition between moving, opening a door, and sitting at specified locations.
5) Allow a slot in the animation blueprint to play specified animations from level/template sequences.
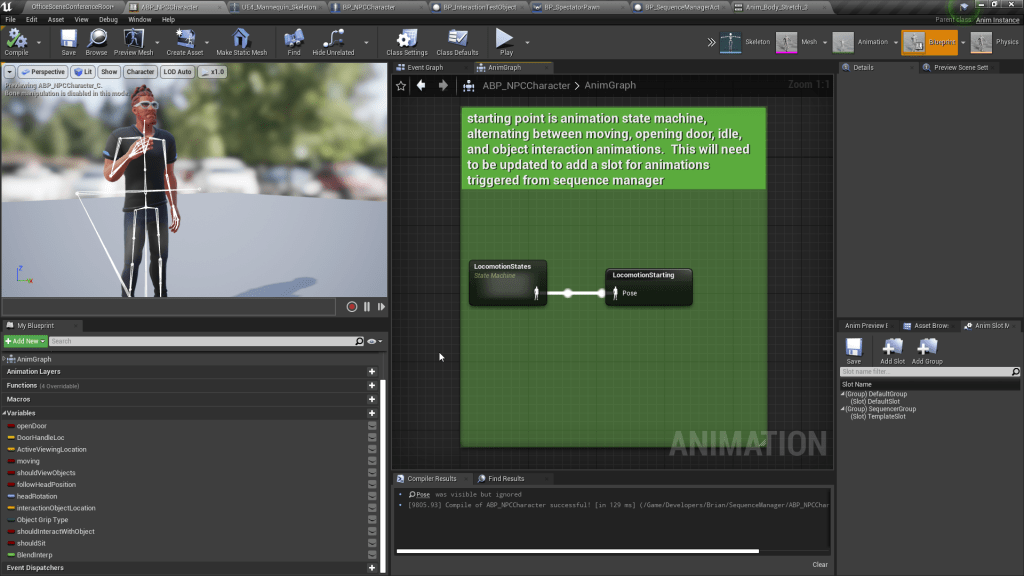
Anim BP Part 1: Locomotion State Machine
The first part of this setup in the animation blueprint is a core locomotion state machine.
This allows for flexible behavior on the character’s base animations, changing between base poses for moving, sitting, idle, and interacting with objects.
Sitting in particular has a unique animation set up. Allowing the player to sit but still play other animations with their upper body uses an animation node called Layered Blend Per Bone. Setting the base pose to an animation where the character is sitting, and then layering on top of it from spine_01 up allows for adding additional animations which affect only the upper body.

Anim BP Part 2: Enabling Template Sequences to Override The Base Animation
https://docs.unrealengine.com/4.26/en-US/AnimatingObjects/Sequencer/HowTo/BlendingAnimBPs/
Following this tutorial link above shows the process for connecting the character blueprint, animation blueprint, and template sequences to allow combining triggering animations in sequencer with the additional functionality of animation blueprints.
In our case, this node is available here and saves its cached pose for use with the later stages in the animation blueprints. This node will need to be updated to apply the same principles for separating sitting and upper body animations and pass in a variable if the animator wishes to set the character as sitting during the animation they configure in the sequence.

Anim BP Part 3: Adding Head & Neck Rotation
This node uses Fabrik IK and passes in a rotation calculated in the character blueprint. The Fabrik IK node in this case is set to copy target rotation, the tip bone is set to the head and the root bone is set to the neck.
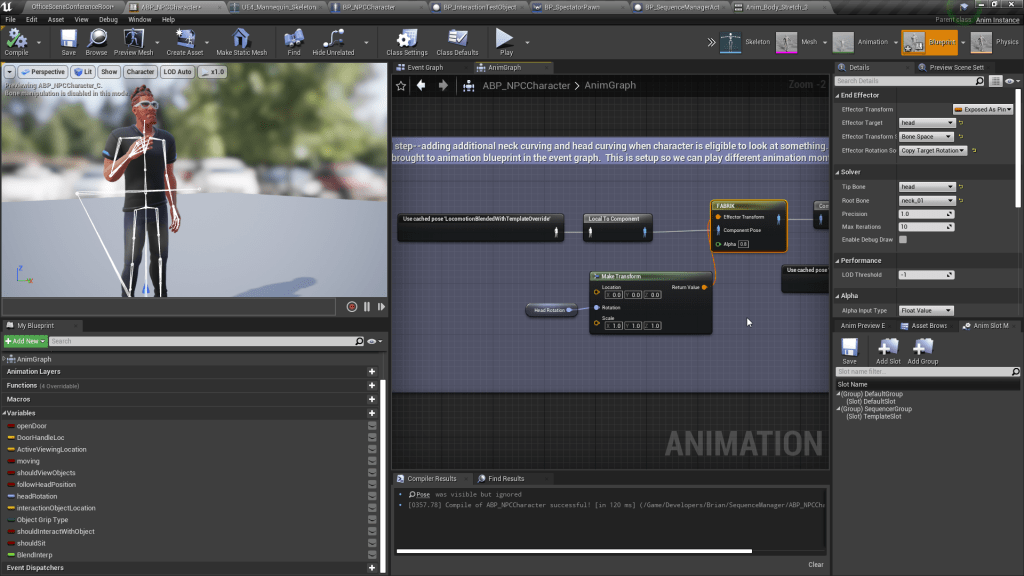

The next step here is a node called Blend Poses by Bool. This allows for turning on and off an animation feature such as this one, so if the programmer or animator turn off in the character blueprint the variable “Follow Head Position”, the pose from the cached animation of the previous step is used instead, without any modification to the head/neck turn.

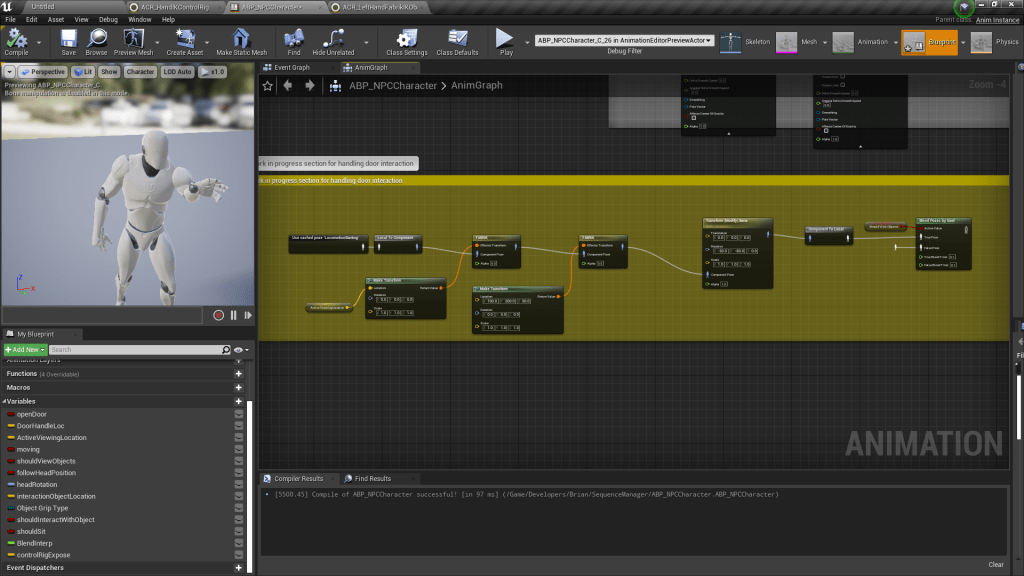
Anim BP Part 4: Adding Object Interaction
This part is still in development, its setup is similar to the neck turning set up but relies instead on the position of an object to match the hand, arm, and shoulder position to this object. It can be turned on and off with a boolean and the character can be set up to only trigger this boolean if an object with a matching interface begins an overlap with the character.
The next step for this is investigating the Power IK plugin to see if we can get better results.
Power IK
Investigation into Power IK seemed a little bit underwhelming because I feel it’s a bad trade off in terms of high complexity but low payoff. Their full body IK tends to twist more parts on the human mannequin than we would really want and in my opinion did not offer as much easy to use flexibility as the fabrik IK nodes in terms of specifying how high up the bone hierarchy you want the IK to influence.
Exploring this however introduced me to learning control rig, which I think has high potential for helping our animation systems.
Control Rig
Building Additive IK with Control Rig Nodes
One of the really attractive things about working with control rig is the ability to pass in parameters and consolidate multiple animation adjustments in one cleaner node.

For example, this older approach of using multiple IK nodes and then adjusting wrist rotation would need all these nodes to be copied in other parts of the animation blueprint if we wanted to re-use the same effect (say we wanted to make an anim bp sequence for shaking hands and grabbing an object). With this approach we could build one control rig for a general purpose (moving the arm towards an object or a hand to shake) but then apply more specific nodes afterwards to the hands and fingers for the difference between hand shaking and object grasping, trimming down the complexity of the overall animation blueprint as these nodes are shared.
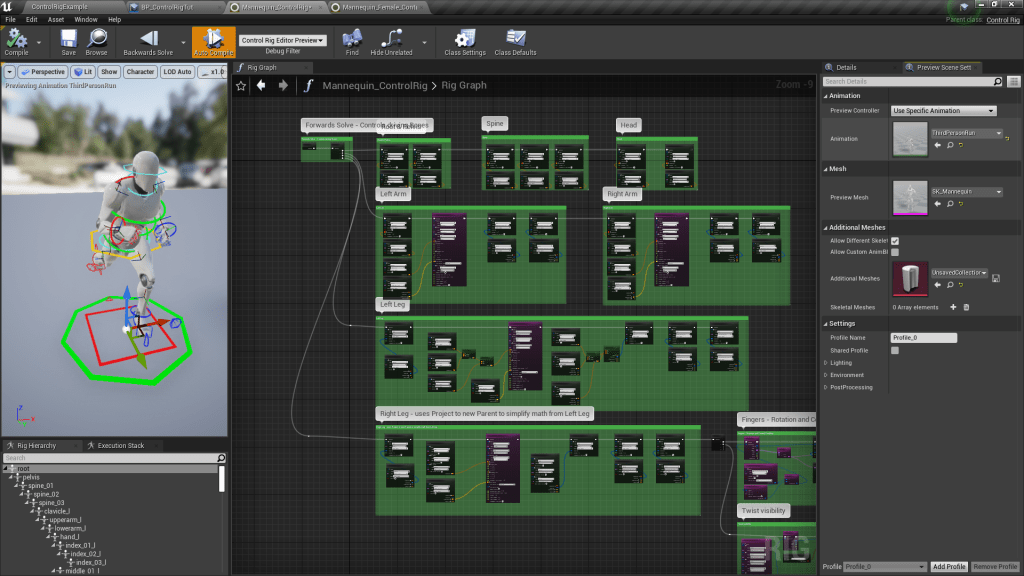
Control Rig Controls, Forward Solve, Backward Solve
After learning about PowerIK and its control rig, I later found that Epic Games has a much more flushed out humanoid control rig for both male and female mannequins available as a downloadable project.

The control rig graph is separated into two sections, forward and backward solve.

The forward solve section means if you place instructions in that section to modify things (such as moving the hand control to a specified location and then specifying that the hand bone in the rig hierarchy moves to the location of that hand control with an IK node), then the control rig when applied in animation blueprint adds those instructions on top of whatever pose is being put into it.
How the control rig interacts with poses being put into it (whether from the animation blueprint or directly specifying an animation) depends upon the backwards solver.
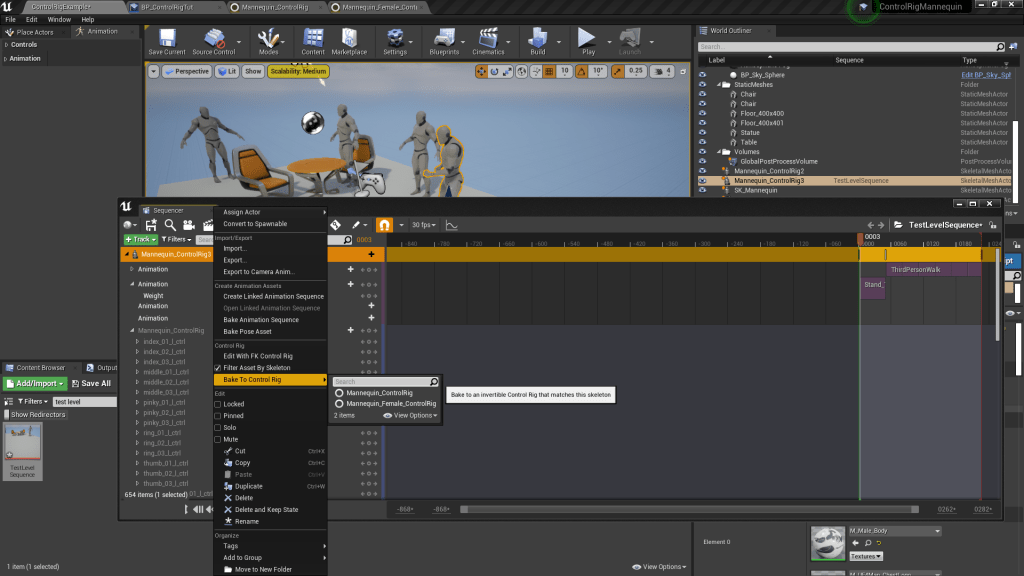
Control Rig And Interaction With Sequencer
Control Rig Forwards Solve vs Backwards Solve
Control Rig Component (for use with Sequencer)
Control Rig vs Re-targeting

Leave a comment